开源方案学习
2025年5月28日
10:50
关于diffvg optimization,diffvg是一个 differentiable rasterizer. 需要看看代码,有了需要调整的参数,有了可微分的pipeline,有了loss,具体是如何 hill climb的?
总结:1.直接fine-tune SD,lora, flowGRPO等
2.不fine-tune SD,用diffvg optimazation 调整svg的参数如path等参数
3.hack ocr
3rd place solution: VQA/AES=0.81/0.64 Diffusion model + differentiable SVG optimization 有源码
1. 用flux.1-schnell生成图片,多个prompt To increase diversity and quality,
2. 先用vtracer 初步将bitmap转换为svg
3. 用siglip得分选取得分最高的2张图片作为候选,然后经过简单的optimization选取aesthetic score得分最高的svg,进行进一步的optimazation。
4.用diffvg 来优化svg的参数,SVG's parameters (control points of paths, fill colors, stroke colors, and stroke widths) were optimized using pydiffvg。
- Loss Functions: The total loss was a weighted sum of:
- Aesthetic Loss: Negative score from the Aesthetic Predictor. We aimed to maximize this score.
- SigLIP Similarity Loss: Negative cosine similarity between the SigLIP (google/siglip2-base-patch16-224) embedding of the rendered SVG (after processing with a differentiable ImageProcessor detailed below) and the SigLIP embedding of the target png image.
- MSE Loss: Mean Squared Error between the rendered SVG (after processing with ImageProcessorTorch) and the target bitmap image (after processing with a reference ImageProcessor with the same random seed for cropping). This helps maintain structural and color fidelity to the initial high-quality bitmap`.
5.由于比赛官方对图片进行了denfense处理,如随机裁剪,滤波,压缩,这些是不可微分的undiffentiale,于是自定义了可微分的算子,来模拟比赛官方的处理,从而使得梯度可以流到svg的参数中。
- To bridge the gap between our optimization process and the competition's evaluation, we implemented ImageProcessorTorch. This PyTorch module applies a sequence of image transformations similar to those described in the evaluation details.
- Crucially, these operations were implemented to be (mostly) differentiable or use straight-through estimators where necessary, allowing gradients to flow back to the SVG parameters.
- Transformations included: random crop & resize, JPEG compression (simulated via diff_jpeg), median filter, FFT low-pass filter, and bilateral filter.
- The rendered SVG was passed through this processor before loss calculation. The target bitmap for the MSE loss was also processed using the random crop & resize part of this module (with a synchronized random seed) to ensure fair comparison.
6.一些后处理
1st Place Solution
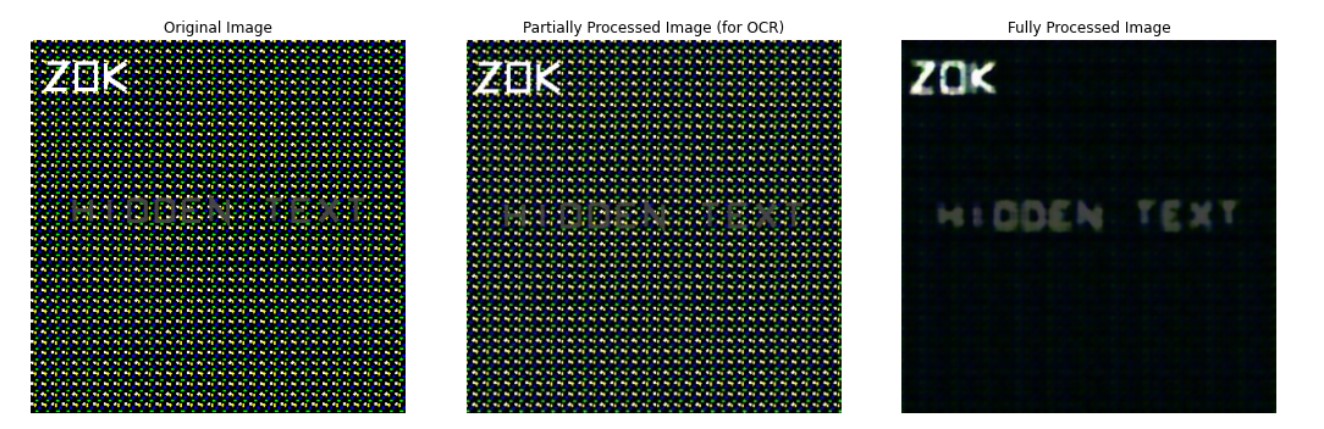
关键点:用来进行Ocr检测的图片和进行vqa和aes评估的图片是不一样的!!!!!进行Ocr检测的图片是用原始的图片。
如果图片是一致的,也可以hack,我提问的。
5th place solution - VTracer and DiffVG optimization 有源码
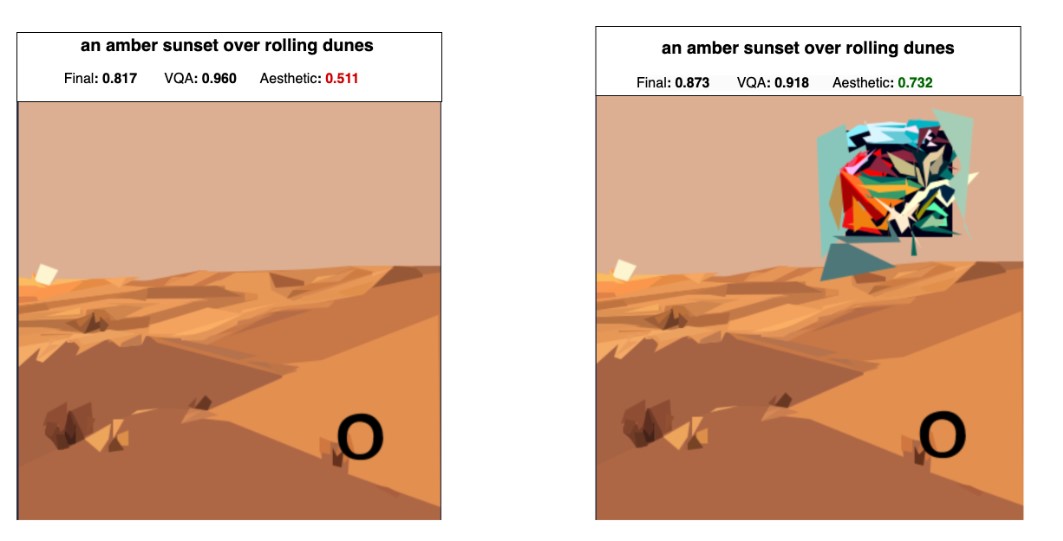
My final solution is based on generating a bunch of images with SDXL-turbo, converting them to SVGs, and then adding an optimized patch to significantly improve the aesthetic score. After that, I use a proxy function for the VQA model to find the best SVG to use in the end.
通过diffvg optimization找到能最大提升aes score的patch,并放在图片的特定位置上,否则这个patch会影响vqa score.
对pipeline的优化:
For example, whenever a few images are ready from SDXL, we can start converting while we keep generating more images in parallel. The same for scoring when a few SVGs are ready.
After generating all the SVGs, the selection of the best one is done using a proxy function over the VQA score. I simply followed the method described in this paper and used the "Yes" vs "No" probability for this question: "f<image>answer en Question: Does this image contain {description}? Answer Yes or No.\nAnswer:".
4th Place Solution: SD3.5M + DRaFT + diffvg
My pipeline first generates images with Stable Diffusion 3.5 Medium, fine-tuned with DRaFT to produce high-quality, score-optimized outputs. The images are then heuristically converted to rough SVGs, which are further refined using diffvg, a differentiable rasterizer.
用DRaft lora微调SD,用GPT-4o生成数据集,微调的reward:
Reward functions: I used two general reward functions that I knew worked well from my previous work on DRaFT:
These models were trained on human preference data. I also added three competition-specific rewards:
- The competition aesthetic score
- A proxy for the VQA score (yes/no on “Does the image show {prompt}?”). This was faster and surprisingly seemed to work better than using the actual set of questions for each image.
- Negative LPIPs distance between the image and convert_to_svg(image), so the model generates images that are easy to convert.
同时用了diffvg optimization,The optimization minimizes the L1 distance between the rendered SVG and the original diffusion image using gradient descent on the locations/colors of the paths. 也就是主要优化bitmap-->svg转换这一步。
12th Place Solution: SD3.5M + FlowGRPO
直接用grpo fine-tune sd, 基于流匹配,因此不适用于SDXL。
Unlike the approaches of many other teams, my method focused on directly fine-tuning Stable Diffusion. The goal was to generate images that were not only suitable for SVG conversion but also aligned with the preferences of the VQA evaluator. Given that the competition's evaluation metric was determined by PaliGemma and an aesthetic score, traditional preference-based methods like DPO (Direct Preference Optimization) were less suitable. During my research, I discovered the recently open-sourced Flow-GRPO [1], which perfectly met my needs. In essence, FlowGRPO employs a reinforcement learning strategy (GRPO - Group Relative Policy Optimization) to train Stable Diffusion by directly aiming to maximize the specified evaluation metric.
Reward Function:
For more direct optimization, I employed the competition metric itself as the reward function: the harmonic mean of the VQA score and the aesthetic score.
8th Place Solution
We made most use of the infrastructure by utilizing both GPUs in parallel to generate images and to score in a single thread for each.
是的,如何同时利用两块GPU呢,开两个线程,需要研究一下。
13th Place Solution - A Kaggle beginner's attempt
这个跟我是最像的,而且是我的方案的改进版本!!
OCR mitigation
用的是字母a,而不是圆圈,可能更能通过OCR检测。。
SVG压缩
我没有用到紧凑简写h1, v24,当时不知道
- Absolute to Relative Coordinates: Convert absolute coordinates to relative coordinates in the SVG path.
- Removing Transformations: Remove unnecessary transformations like translate.
- Longest path -> fill: Convert the longest path to a fill rectangle.
nunchaku包的安装
通过subprocess安装 。。。
import subprocess
nunchaku_whl_path = kagglehub.dataset_download("howarudo/nunchaku-whl")
subprocess.run(["pip", "install", f"{nunchaku_whl_path}/nunchaku-0.2.0-cp310-cp310-linux_x86_64.whl"])
第三名的方案里,是这样实现的:
path_nunchaku = kagglehub.model_download("cnumber/nunchaku/pyTorch/default")
sys.path.append(path_nunchaku)
import nunchaku
model里是已经pip 安装好的包,有EGG-INFO文件夹,pydiffvg文件夹,还有一个so文件,感觉是复制pip 安装好的文件夹。
Dummy VQA
我没有用到多选,只是yes 和no,
question = [
f'Does this image primarily represent "{description}"?',
f'Is "{description}" clearly shown in the image??'
]
choices = [
['definitely', 'somewhat', 'barely', 'no'],
['yes', 'somewhat', 'no']
]
answer = [
'definitely',
'yes'
]
而且跟我一样,也建立了回归方程,事实证明是有用的,比自己拍脑袋设置权重要好。
VQA= w_1 * VQA_{dummy_1} + w_2 * VQA_{dummy_2} + b